
Appointments are created directly within the Calendar on the Control Centre. Appointments are assigned to Patients, and can record start and end times, treatments, and the Clinic resources required.
- From the Control Centre menu drawer click the “Scheduling” option.
- Click the “Calendar” option
- The calendar displays the current month, with any booked appointments
- Tap the “+” add button in the bottom right hand side to create a new appointment./li>
- The Appointment window will slide in from the right hand side of the screen
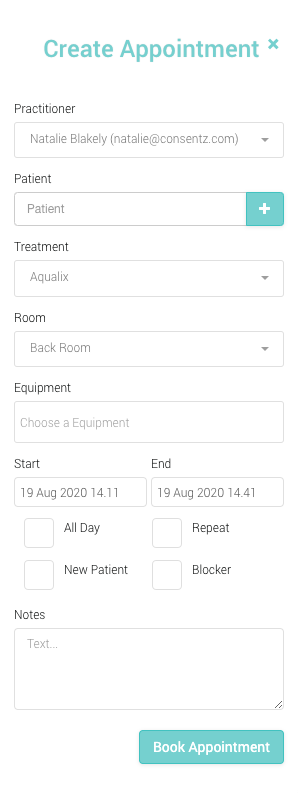
- Practitioner Choose a practitioner to assign to the appointment
- Patient Select a Patient to assign the Appointment to, or create a new Patient
- Room Assign a Room resource to the Appointment
- Equipment Assign an Equipment resource to the Appointment
- Treatment Assign a Treatment to the Appointment
- Start Record a Start Time
- End Record an End Time
- All-Day Creates an All Day event
- Repeat Creates an repeat event – further options will appear
- New Patient Flags the Appointment as one for a New Patient
- Blocker Creates a block of Time
- Notes Record notes for the Appointment
- Click “Practitioner” and select a practitioner from the drop down list.
- Begin typing the name of the patient in the ‘Patient’ text box.
- Results based on the letters typed will appear below the text box.
- Select the correct patient for the appointment.
- If the Patient is not in the list, you can create a New Patient, by clicking the ‘+’ button to the right of the text box.
- Once selected, click on the “Room” and “Equipment” drop down menus to assign resources to the Appointment. A list of the respective resource will appear for you to select. These are optional for creating an appointment.
- Click the “Treatment” drop down menu to assign a treatment to the Appointment. A list of Treatments will appear for you to select.
- Clicking on the “Start” time will bring up a small calendar for you to assign a start date and time. You can also type the time into the text box.
- Clicking on the “End” time will bring up a small calendar for you to assign an end date and time. You can also type the time into the text box.
- If the appointment is an all day event, such as a holiday or training, then selecting the “All-Day” option will remove the need of assigning a Patient and allow a text entry box to record the event description. This description will appear at the top of the day in day view.
- If you wish to record the patient as a new patient toggling the “New Patient” switch will place a new patient flag on the Appointment.
- “Blocker” allows you to create an appointment without assigning a Patient. It should be used for creating blocks of time where Patient Appointments can’t be created, such as lunch. If selected, a text box will replace the Patient Name, allowing you to type in a description for the Blocker.
- If required, you can attach a note to the Appointment by typing into the Note box at the bottom of the Appointment Window.
- Click ‘Save’ to create the appointment.