
A sketch can be created using the Practitioner Application. It is accessed via the consultation tool, and assigned to a Patient in the same way that a photograph is.
- Enter the ‘Consultation Tool’ via the Calendar Appointment, or by selecting the Patient in the Patient List
- Select ‘Sketch’ from the list on the left hand side of the screen
- The ‘Sketch Tool’ will appear in the main window
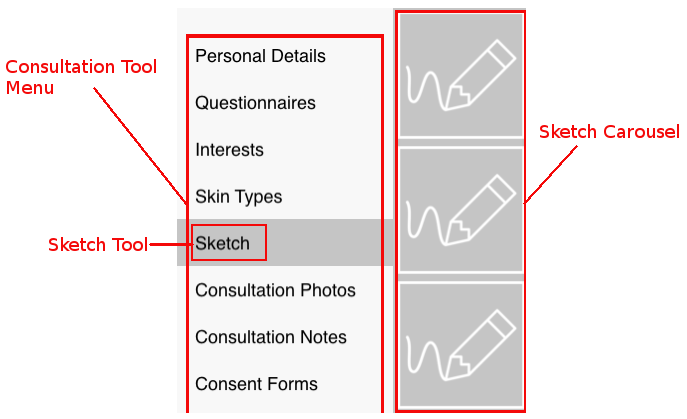
- Sketch Carousel A vertical list of previous sketches made for this patient
- Icons Buttons used to manage your sketches
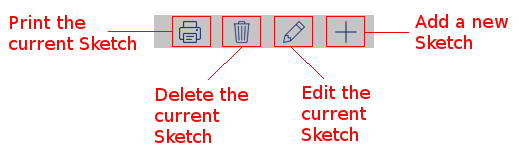
- Print Print the currently selected Sketch. This icon is not visible if there are no sketches.
- Delete Delete the currently selected Sketch. This icon is not visible if there are no sketches.
- Edit Edit the currently selected Sketch. This will load the image into the Sketch Tool.
- Add Add a new Sketch. This will open a new blank canvas.
- To begin a new sketch, tap the ‘+’ button in the top right hand part of the screen
- This will create a new blank canvas for you to begin sketching
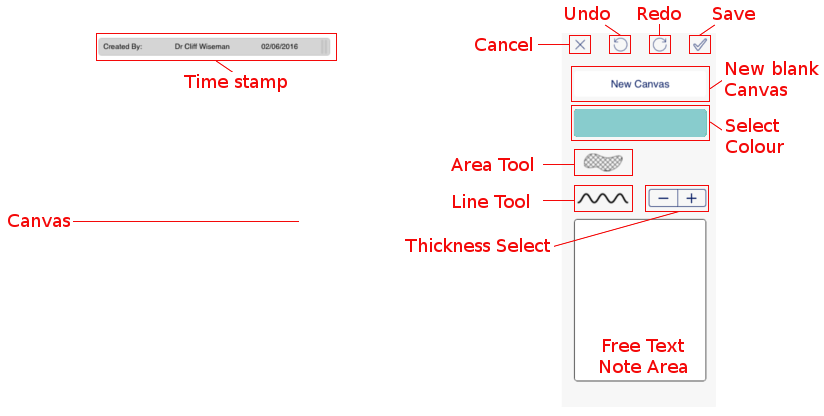
- Canvas The large white area is the Canvas. Once a tool has been selected you can draw on the canvas.
- Time Stamp The Time Stamp appears at the top of every canvas, displaying the date and the name of the Practitioner.
- Cancel Tap this to cancel and exit the sketch tool.
- Undo Tap here to undo the last action you took.
- Redo Tap here to redo any action you took – use this if you have tapped the ‘Undo’ button too many times.
- Save Tap the Tick to save and exit the sketch tool. The image will be saved to the Carousel.
- New Canvas Tap new Canvas to delete the current canvas and start again with a blank one. Note This will destroy any unsaved work.
- Select Colour Tap here to select a colour for your tools.
- Area Tool Selecting this tool allows you to cover a large area in a single colour. The area shape is flexible and can be created by tracing your finger around the canvas area.
- Line Tool Selecting this tool allows you to draw lines and dots.
- Line Thickness By tapping on the ‘-‘ and ‘+’ signs you can decrease and increase the thickness of the line tool.
- Note Area The note area allows you to record notes using the keyboard.
- Select a tool and create your Sketch by drawing with your finger on the canvas.
- Once finished, tap the ‘Tick’ to exit and save you Sketch.
- Your saved Sketch will appear in the Sketch Carousel.